
The Cricut Maker continues to surprise me with all that it can do, and with the launch of 4 new blades the possibilities are endless. I’m excited to share what these Cricut Maker Blades do and how I’m taking our movie night to the next level with 2 new blades by making Disney Movie Night Tickets.

When the Cricit Maker was launched we were promised that this machine would evolve and offer more possibilities, and I’m happy to say that the launch of 4 new blades is keeping Cricut true to that promise. These blades, Perforation, Wavy, Debossing and Engraving are opening some pretty cool doors.

Cricut Quickswap Housing
These news blades can all be used with the Quickswap Housing. What does this mean, well it means that you can easily swap out the tips. Just push down on the top button and the tip will release. I like that once you purchase a Quickswap housing, you’ll only need to purchase the tips moving forward, and don’t forget that you can easily store these in the front tray of your Maker.
Cricut Perforation Blade
Lets start with the perforation blade. I have so many ideas for this blade and decided to try out making some tickets for our family movie nights. The kids love that they turn in tickets and I love that I can easily add a perforation line to rip the tickets. This blade goes back and forth to make the line and doesn’t cut all the way through so it gives the perfect rip.
Tip: I do recommend that you carefully remove the paper from the mat so avoid opening or ripping the item.
Cricut Debossing Blade
This blade is what I like to think of as a detail blade. It adds some extra texture and a bit of a 3D feel to the paper.
Tip: It presses down really hard so you’ll want to use your spatula to get the paper off the mat and avoid any paper curling!
Cricut Wavy Blade
Oh this blade makes me smile, and it’s also a time saver blade as it’s able to give a wavy affect for countless projects in half the time it would take the regular blade to cut. I think this blade will probably be used the most for me between gift tags, earrings, iron on and much more.
Cricut Engraving Blade
I think this blade is the intriguing one as it really allows you to you use some different materials and bring forward projects that I would never have thought possible with a Cricut.
Tip: There’s a little more prep, as you’ll want to tape down the item to the mat to ensure it doesn’t move around.

How to use Cricut Maker Blades
What you have to understand is using these blades in the Cricut Maker is easy peasy. Each blade is labeled with a number. Some blades have covers as they are sharp. To switch the blades just push down on the top button and pop it off then add the new blade. When it’s time for cutting you’ll be prompted to add the blade into the machine, and just open it up and add. The technology of the maker is able to read the blade to ensure you’re cutting with the correct one. It’s awesome.
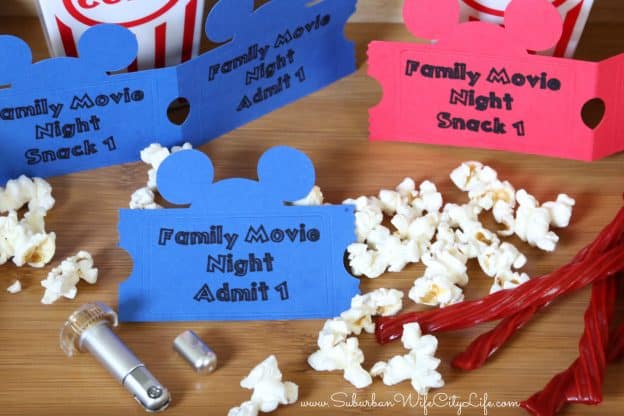
Family Movie Night Tickets
I wanted to pull together a fun project to share how to use the 2 of the blades, and came up with make some family movie night tickets as we love to watch movies and this would be a good way for the kids to earn tickets and snacks. I also went with a Disney theme because we love watching Disney movies.

When designing in Cricut Design Space you’ll want to make sure you’re selecting the correct blade. Which is done by the drop down as pictured above. For the completed design check it out Mickey Tickets.

This project was all about switching things out, using a pen (I found the .8 to be the best for writing) Debossing blade, Perforation blade, and then fine point blade. What’s great is when you’re ready to make it it’s all laid out what blades need to be used and when to install them.

Cricut Maker Blades
These 4 blades are just the start for the Cricut Maker and I love knowing that they will continue to branch out and add more.
Do you have a Cricut Maker? What will you make with the new blades?
Make sure you check out my other Cricut posts:
 Cricut Infusbile Ink
 Cricut Print then Cut
 Cricut Easy Press 2
 This is me Destiny! I'm a content creator that covers DIY, Cricut, Travel, National Parks, Disney, Games and Family. I’m navigating life with my husband Mike, 2 kids and live in the suburbs of Maplewood, New Jersey.